
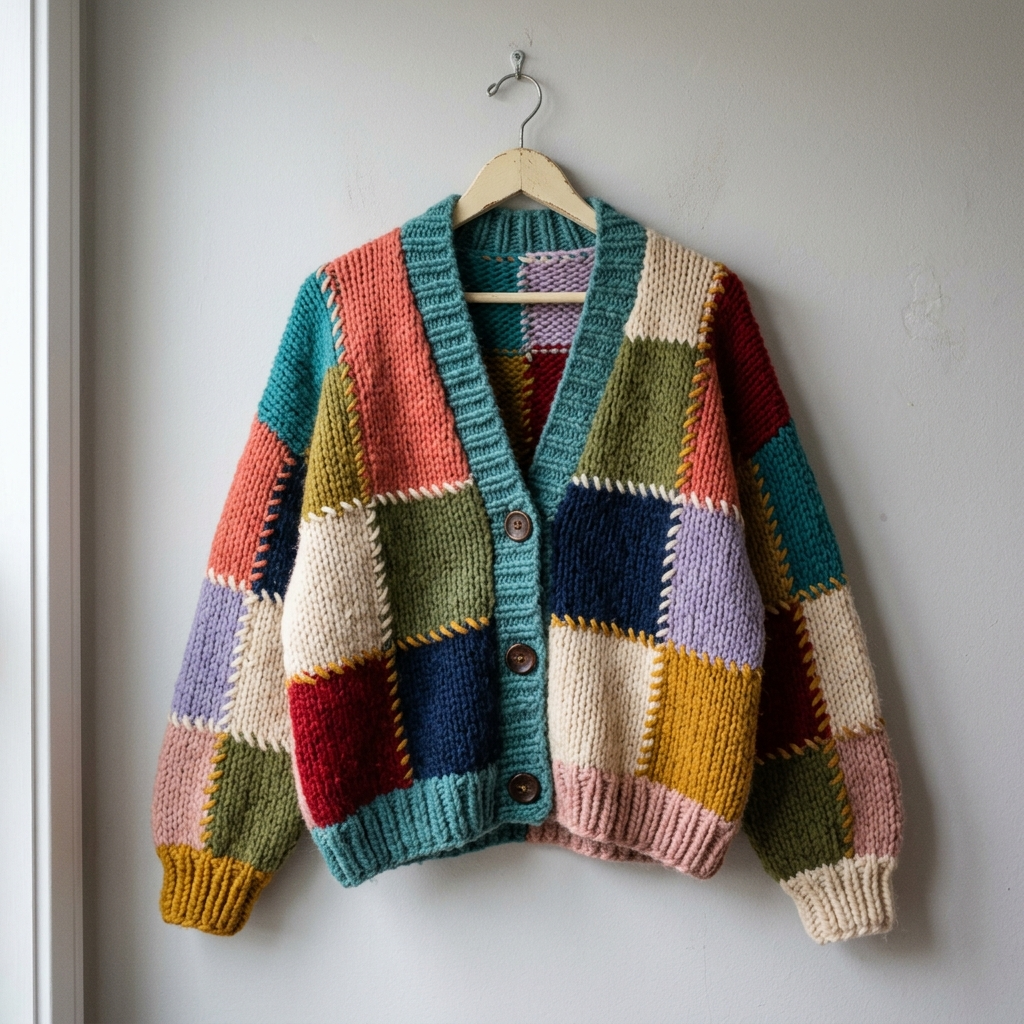
If you’ve been collecting beautiful yarn remnants and wondering what to do with them, this cozy patchwork cardigan is your answer. The featured design shows a beautifully chunky V-neck cardigan constructed from individually knitted squares in a cheerful palette of teal, coral, olive green, navy, cream, mustard, lavender, blush pink, and deep red. Each square is joined with decorative blanket stitch seaming in contrasting colors, giving the whole piece that handcrafted, folk art quality. This is a true stashbuster that turns your odds and ends into a statement piece.

About This Patchwork Cardigan
Looking at this cardigan, you can see it features an oversized, relaxed fit with dropped shoulders and a cropped length that hits right at the hip. The body is made entirely of stockinette stitch squares, while the button band, neckband, and cuffs are worked in 1×1 ribbing in a coordinating teal. Four wooden buttons close the front, and the visible blanket stitch seaming adds both structure and visual interest.
The construction is beginner-friendly because you are simply knitting squares and rectangles, then seaming them together. No complicated shaping, no picking up hundreds of stitches at once. If you can knit, purl, and sew a basic seam, you can make this cardigan.
Materials
- Yarn: Approximately 800 to 1000g total of chunky weight yarn (Bulky #5) in 8 to 12 colors of your choice. You will need roughly 60 to 80g per color minimum, depending on how many squares you want in each shade.
- Needles: US 10 (6mm) straight or circular needles for squares. US 9 (5.5mm) needles for ribbing.
- Notions: 4 wooden buttons (approximately 25mm diameter), tapestry needle, stitch markers, contrasting yarn or embroidery thread for blanket stitch seaming.
- Gauge: 14 stitches and 20 rows = 4 inches in stockinette stitch on US 10 needles. Gauge is important for sizing, so please swatch.
Finished Measurements
This pattern is written for a relaxed fit in size Medium. Adjust square count for other sizes.
- Chest: 48 inches (oversized fit)
- Length: 22 inches from shoulder to hem
- Sleeve length: 18 inches from underarm to cuff
- Each square: Approximately 5 inches by 5 inches
Abbreviations
- K = Knit
- P = Purl
- St(s) = Stitch(es)
- RS = Right side
- WS = Wrong side
- CO = Cast on
- BO = Bind off
- Rep = Repeat
Pattern Notes
This cardigan is constructed from 48 individual squares plus additional rectangles for shaping. The squares are seamed together using decorative blanket stitch, then the ribbed bands are picked up and knitted. Work each square flat, block before seaming, and take your time with the finishing for professional results.
The color placement in the featured cardigan appears random but balanced. Lay out all your squares before seaming to ensure no two identical colors sit directly next to each other.
Individual Square Pattern
Make 48 squares total. Vary colors as desired.
Using US 10 needles and your chosen color, CO 18 sts.
Row 1 (RS): Knit all sts.
Row 2 (WS): Purl all sts.
Rep Rows 1 and 2 until piece measures 5 inches from cast on edge, ending with a WS row. This should be approximately 25 rows.
BO all sts knitwise on RS.
Weave in ends. Make 48 squares total.
Half Squares for Armhole Shaping
Make 4 half squares (2 for each armhole).
Using US 10 needles, CO 18 sts.
Row 1 (RS): Knit all sts.
Row 2 (WS): Purl all sts.
Rep Rows 1 and 2 until piece measures 2.5 inches, ending with a WS row.
BO all sts. These rectangles fill the gaps at the armhole joins.
Blocking
Before assembly, wet block all squares. Soak in lukewarm water for 20 minutes, gently squeeze out excess water (do not wring), and pin each square to blocking mats, measuring to ensure consistent 5 inch by 5 inch dimensions. Allow to dry completely. This step is essential for even seaming.
Assembly Layout
Back Panel
Arrange 16 squares in a 4 wide by 4 tall grid. This creates a back panel measuring approximately 20 inches wide by 20 inches tall.
Left Front Panel
Arrange 6 squares in a 2 wide by 3 tall grid. This creates a front panel measuring approximately 10 inches wide by 15 inches tall.
Right Front Panel
Mirror the left front with 6 squares in a 2 wide by 3 tall grid.
Sleeves (Make 2)
Arrange 10 squares for each sleeve in the following configuration:
- Rows 1 and 2: 2 squares wide
- Rows 3, 4, and 5: 2 squares wide
This creates a rectangular sleeve measuring approximately 10 inches wide by 25 inches long. The sleeve will be gathered slightly into the ribbed cuff.
Seaming with Blanket Stitch
The blanket stitch seaming is what gives this cardigan its distinctive patchwork appearance. Use a contrasting color for maximum visual impact, as shown in the featured cardigan where cream, mustard, and teal stitching outlines each square.
How to Work Blanket Stitch Seam
- Thread tapestry needle with contrasting yarn, approximately 3 times the length of the seam.
- Hold two squares with wrong sides together (so the blanket stitch shows on the outside).
- Insert needle from back to front through both layers, about 1/4 inch from the edge.
- Leaving a 4 inch tail, bring needle back through both layers 1/4 inch to the right.
- Before pulling tight, pass needle under the working yarn to create the characteristic blanket stitch loop.
- Continue across the seam, keeping stitches approximately 1/4 inch apart and 1/4 inch deep.
- Secure end and weave in tail.
Seaming Order
- Join squares into rows first, seaming horizontally.
- Join rows together, seaming vertically.
- Seam shoulder seams, joining back panel to front panels at top corners (leaving center back neck open).
- Attach sleeves by seaming top of sleeve rectangle to armhole opening.
- Seam sleeve underarm and side seams in one continuous line.
Button Band
The button band is picked up and knitted in one piece along both fronts and around the back neck.
Using US 9 needles and teal yarn, with RS facing, beginning at bottom right front corner:
Pick up and knit approximately 60 sts along right front edge, 8 sts along right front neck shaping, 24 sts across back neck, 8 sts along left front neck shaping, and 60 sts along left front edge. Total approximately 160 sts. Adjust as needed for your gauge, picking up roughly 3 sts for every 4 rows.
Row 1 (WS): K1, P1 across all sts.
Row 2 (RS): K1, P1 across all sts.
Rows 3 to 4: Rep Rows 1 and 2.
Row 5 (Buttonhole Row, WS): Work in pattern for 4 sts, BO 2 sts, work in pattern for 14 sts, rep from to 3 more times (4 buttonholes total, evenly spaced along right front), work in pattern to end.
Row 6 (RS): Work in pattern, casting on 2 sts over each gap using backward loop method.
Rows 7 to 10: Continue in 1×1 rib.
BO all sts in pattern. The finished band should be approximately 1.5 inches wide.
Cuffs (Make 2)
Using US 9 needles and teal yarn (or mustard for contrast as shown on one cuff in the featured image), with RS facing, pick up and knit 32 sts around sleeve opening.
Join to work in the round, place marker.
Round 1: K1, P1 around.
Rep Round 1 until cuff measures 3 inches.
BO all sts loosely in pattern.
Finishing
- Weave in all remaining ends securely.
- Sew buttons to left front band opposite buttonholes, spacing evenly.
- Give finished cardigan a final light steam block, being careful not to flatten the ribbing.
Tips for Success
Color Planning: Before you start knitting squares, lay out your yarn and sketch a rough color map. The featured cardigan balances warm tones (coral, red, mustard) with cool tones (teal, navy, lavender) and uses neutrals (cream, blush) to give the eye a place to rest.
Consistent Squares: Even small variations in square size will create puckering. Check your gauge frequently and block carefully.
Seaming Tension: Keep your blanket stitch tension consistent and relaxed. Stitches that are too tight will pucker the fabric. Practice on swatches first.
Yarn Substitution: Any chunky weight yarn will work. This is a perfect project for mixing fiber types, just be aware that different fibers may block differently.
Sizing Adjustments: For a smaller size, use 3 squares across each front instead of 2 and reduce back to 3 squares wide. For larger sizes, add an additional column of squares to the back and fronts.
Common Mistakes and How to Fix Them
Uneven squares: If your squares are coming out rectangular instead of square, your row gauge may be off. Add or subtract rows as needed, measuring frequently.
Puckered seams: This usually means your blanket stitch tension is too tight or your squares were not blocked to uniform size. You can carefully remove and redo problem seams.
Button band pulling: If your button band ripples or pulls the fronts inward, you picked up too many stitches. Rip back and pick up fewer stitches, or switch to a needle one size smaller.
Sleeve fit: The drop shoulder construction means sleeves will have a relaxed fit. If you prefer a more fitted sleeve, pick up additional stitches at the cuff and work decreases over the first few rounds of ribbing.
Making It Your Own
This basic patchwork construction opens up endless possibilities. You could add embroidered details to individual squares before seaming, try different decorative seaming techniques like herringbone or cross stitch, or incorporate textured stitches like seed stitch or garter stitch for some of your squares.
Some knitters add pockets by leaving the bottom edge of one front square unseamed, then seaming it on three sides to create a patch pocket.
The finished cardigan is wonderfully warm and substantial, perfect for chilly autumn days or cozy evenings at home. The chunky yarn works up quickly, and the patchwork construction means you can pick up and put down the project easily, knitting just one square at a time if that suits your schedule.
I hope this pattern helps you turn your yarn stash into something beautiful and wearable. If you make this cardigan, I would love to see how your color choices came together. Share your finished patchwork cardigan and let us know which colors you chose.